This guide will cover basic setup and usage of the SORCERER Storm.
SETUP SSH KEY
The cloud-based SORCERER Storm relies on the internet for transferring files. Since internet speeds vary, for reliably transferring large files (over 100MB) we recommend using file transfer clients such as WinSCP or FileZilla.
In order to use file transfer clients and to gain command line access to the SORCERER, you will need to set up a secure access key (SSH key). Please follow the instructions below for your type OS platform to generate a new SSH key pair. You will send us the public key (.pub file) while the private key will be specified to the file tranfer client.
WINDOWS
1. Download PuTTYgen.exe.
2. Run PuTTYgen.exe. A window opens where you can configure your key generation settings.
3. The puttygen parameters may be left at their defaults. Optionally, you can enter a Key passphrase to protect your key. Please record this passphrase if you set one as you will be prompted for it when you use the key.
4. Click the Generate button to generate a new key-pair. Move the mouse around as directed. When you are done generating the key-pair, the tool displays your public key value.
5. Click Save private key to write your private key to a file with a .ppk extension (ex. sorcererstorm-ssh-key.ppk). Place this key in a secure location and remember where it is located as the file transfer client will need this file. Do not share this file.
6. Click Save public key to write your public key to a file with a .pub extension (ex. sorcererstorm-ssh-key.pub) .
7. Please have the authorized SORCERER Storm account holder email the public key .pub file from step 6 to Support@SageNResearch.com to have the SSH key added to your SORCERER Storm configuration.
LINUX AND OSX
1. Open a terminal on your workstation and use the ssh-keygen command to generate a new key-pair. Note: the public key will end in .pub, the private key will have no extension. While this example uses sorcererstorm-ssh-key as the filename, you may choose any filename for the key pair.
ssh-keygen -t rsa -f ~/.ssh/sorcererstorm-ssh-key -C sorcerer
2. When prompted for a passphrase, enter any passphrase you like to protect your key or leave it blank. Please record this passphrase if you set one as you will be prompted for it when you use the key.
3. Restrict access to your private key so that only you can read it and nobody can write to it.
chmod 400 ~/.ssh/sorcererstorm-ssh-key
4. Please have the authorized SORCERER Storm account holder email the public key ~/.ssh/sorcererstorm-ssh-key.pub file to Support@SageNResearch.com to have the SSH key added to your SORCERER Storm configuration.
UPLOADING FILES WITH A FILE TRANSFER CLIENT
This example will use FileZilla since it works on multiple platforms (Windows, Linux, OSX). Please contact support if you would like help configuring another file transfer client.
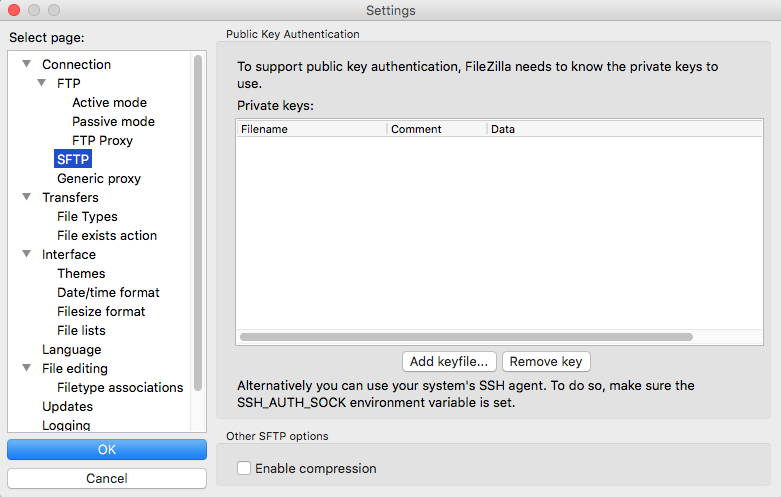
1. Download and install Filezilla. Once installed, start FileZilla and go to the Settings page. Under Connection click on SFTP. Under Public Key Authentication, click Add Keyfile and select the private key file you created above.
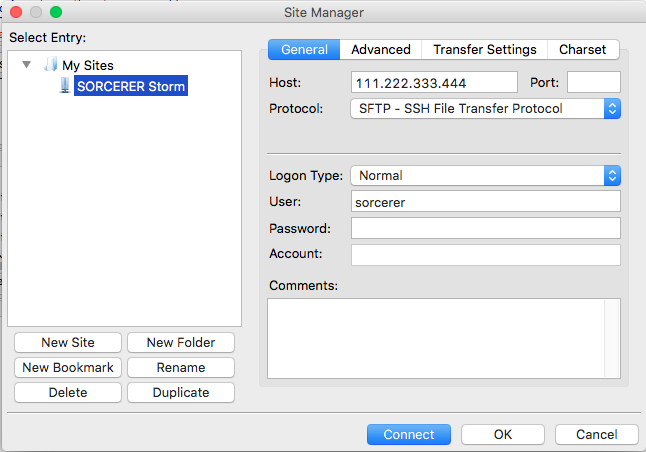
2. Next in FileZilla’s file menu bar, click on File and click on Site Manager. Click New Site to create a new entry for your SORCERER Storm. Enter a name for the site (ex. SORCERER Storm) in the left hand window, then input the following parameters:
HOST: <Enter the IP address of your SORCERER Storm>
Port: <Leave this blank>
Protocol: SFTP – SSH File Transfer Protocol
Logon Type: Normal
User: sorcerer
Password: <Erase anything in this box and leave it blank>
Click OK to save this entry.
3. To access the SORCERER Storm file system from FileZilla, just start the Site Manager and click the SORCERER Storm entry we just created to connect.
UPLOADING AND DATA TYPES
When connected with FileZilla, you only need to concern yourself with two directories, data and fasta, which we cover below.
data – Upload the spectra files you want to search into this folder. You may create subfolders in this directory to better organize your data. While the Sorcerer supports multiple spectra formats, for full compatibility with SorcererScore please use mzXMLs files. A guide for converting Thermo RAW files to mzXML files can be found Here.
fasta – Upload standard FASTA format protein database files ending in .fasta directly into this directory.
SORCERER WEB INTERFACE
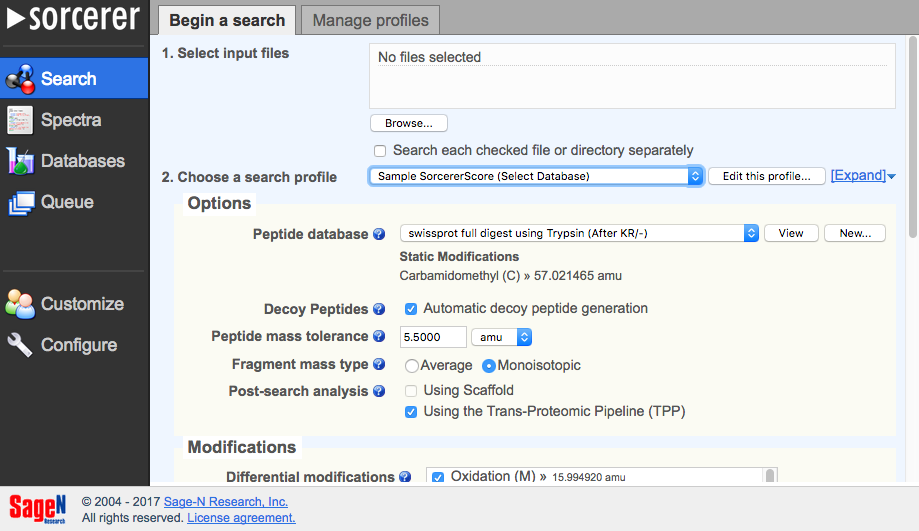
The Sorcerer web interface was designed to be simple: 1) Choose your spectra files to search, 2) Select the peptide database, 3) Select your search parameters, and 4) Submit. The Queue will contain submitted searches and show their status. Viewing your search results will be done through the Queue.

CREATING A PEPTIDE DATABASE
On the Search page, you select the peptide database to search from a drop down list of peptide databases previously created from a fasta file. To create a new peptide database to add to this list, click on Databases and then click on the Create a Database tab.
Any .fasta files that are in the fasta folder on the Sorcerer file system will appear in the FASTA database drop down list. See the instructions above for uploading your fasta files. Select your fasta file from the drop down list, digest conditions, static modifications if any, and submit. You will see the progress of the peptide database preparation in the Queue. Generally it should only take minutes for most full tryptic submissions.
SUBMITTING A SEARCH
On the Search page, for Select Input files, browse and select your spectra files. Again we recommend mzXML for full compatibility. As a reminder, the files shown here correspond to the data folder on the Sorcerer file system.
For selecting search parameters, we’ve included some sample search option profiles which you can select by using the Choose a Search Profile option and selecting an option from the drop down list.
Then select your peptide database from the drop down list.
Feel free to customize the search parameters to your own experiment. If you have questions regarding the search parameters, click on the question mark icon next to the option or contact support. You may save your search options and selected database by using the Save as a new profile option at the bottom of the Search page. This way, if you search different data with the same conditions in the future, you can just choose it from the search profile drop down list.
Submit the search once you’ve verified your spectra files, peptide database selected, and search options are correct. Based on the size of your data and search conditions, the search can can take anywhere from minutes to days.
QUEUE
Any submitted searches and peptide databases will appear in the queue. The progress of any currently running search can be found here. You may click on completed searches to view the results. Results can be viewed in the TPP Analysis tab.
TIPS
-
It is recommended to run small sets of data and moderate search conditions for trial period searches since larger searches with extreme search conditions will take longer.
-
The Sorcerer web interface password can be changed by clicking Configure and then clicking on the Password tab. Changing your web interface password does NOT change the password to the sorcerer user account password which is used for SSH file transfers, command line access, and RStudio.


Leave a Reply
Send Us Your Thoughts On This Post.